Digital Credentials 101: How to Use Sertifier for Credential Management
Sertifier is an all-in-one web application allowing you to design, send, track, and store digital certificates and badges.
Sertifier is a web application and integrable software that revolutionizes the traditional credentialing process by allowing users to create and design digital and verifiable credentials. It automates the process by enabling bulk sending via one template to all students, employees, or attendees. Sertifier users can track campaign metrics, measure earner engagement, and calculate the marketing contribution of their credentials.
Here at Sertifier, we provide analytics and report tools for education management and tracking with the selection of different subscription plans.
To register, you can go to https://app.sertifier.com/en/signup.
How to Design a Credential?
To begin designing your credential, access the Credential Design option in the left menu of our web application. From there, select Create New Design to get started with your first design. Feel free to switch between the Badges or Certificates tabs above to work on the type of design you prefer.
Begin by choosing from the available certificate templates in the left menu.
If your institution utilizes a pre-made design or template for certificates, you also have the option to upload it. Simply click on the Upload Design button in the left menu. Ensure that your design is A4-sized and in SVG, PNG, JPG, or JPEG format. You can then proceed to customize these designs as needed.
Use the Upload Image button on the Image tab to upload any JPG and PNG image for design purposes, like logos or icons. The Add Text button creates a text box that remains consistent on every certificate.
To customize your design, access the Attributes option in the left menu and easily add various attributes like Recipient Name and Credential ID by dragging and dropping them. To remove any attribute, simply click on it and then use the Trash icon on the top menu (Avoid manually deleting an attribute by pressing backspace on your keyboard).
Adjust the font, size, and color of the text using the options provided in the top menu.
Utilize the QR Code feature to include scannable QR codes on your digital certificates. Access the QR Code tab to incorporate a QR Code onto your certificate, and adjust its colors by selecting the paintbrush icon at the top.
Once you create your design, you can click Save Design and proceed to send your certificate.
How to Send a Credential?
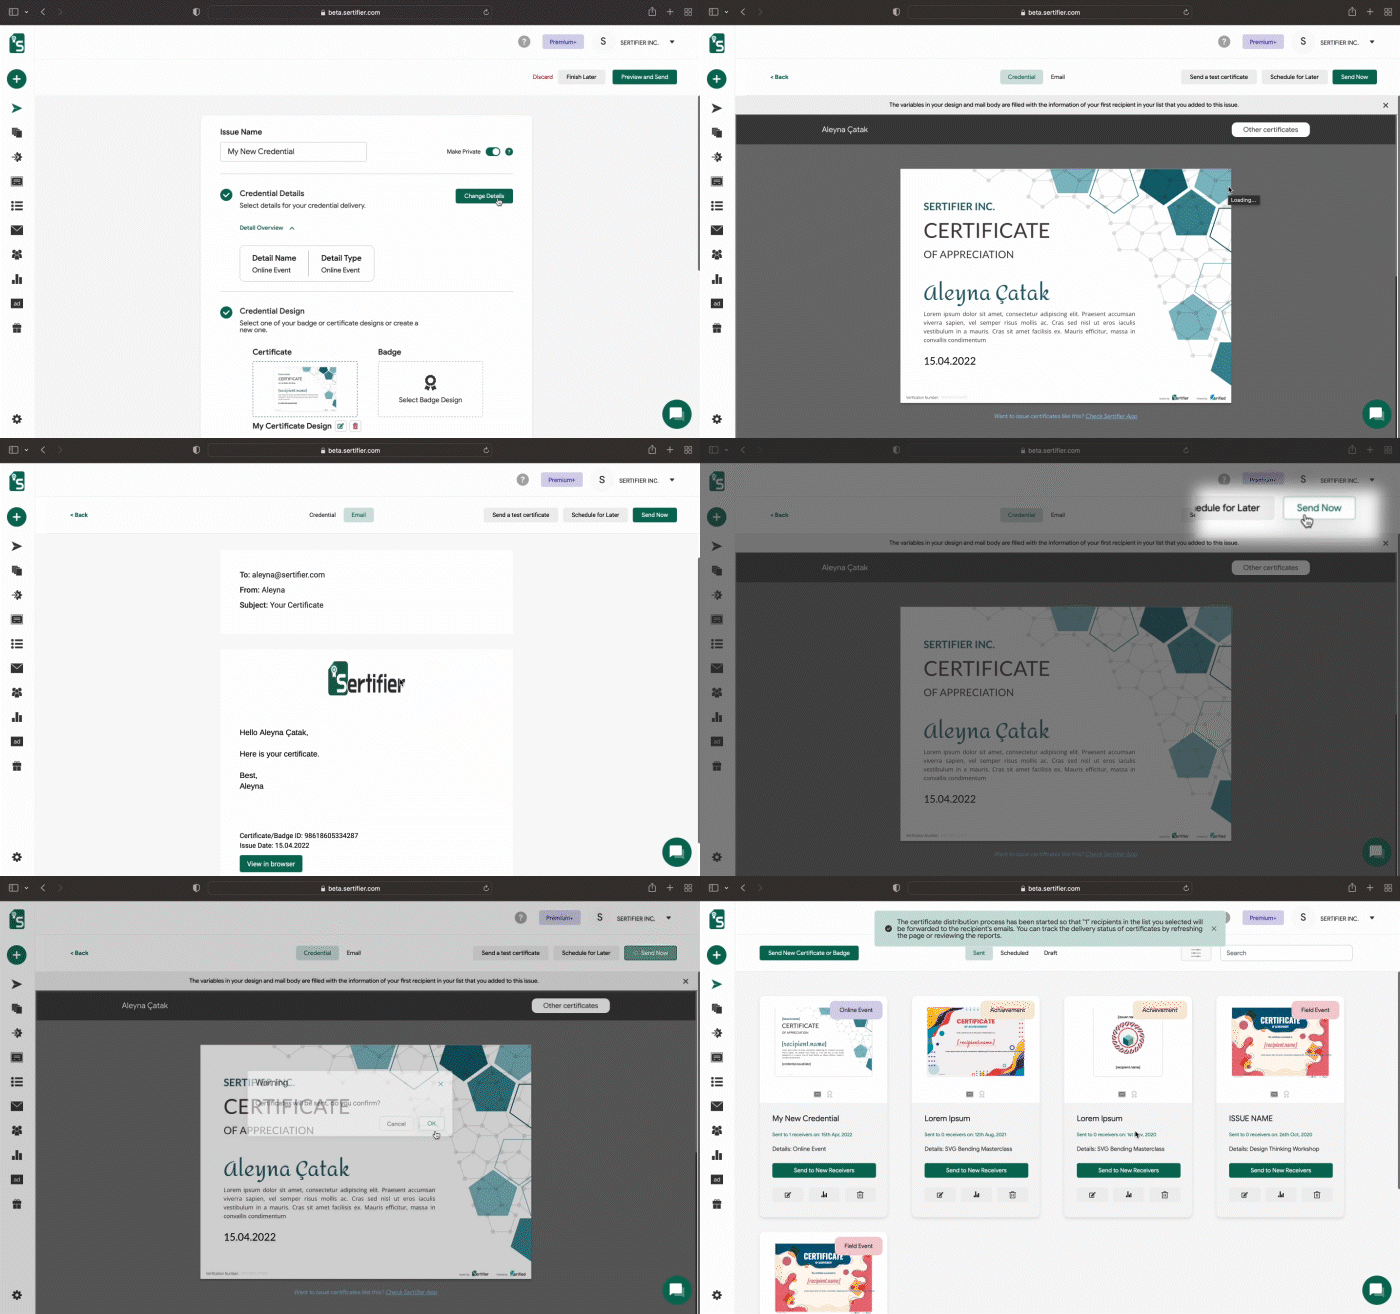
To send a new certificate, simply click on the Create & Send New Credential button located in the top left menu after logging into the application.
You can review and edit all steps for creating a credential delivery from this page.
Begin by updating the delivery name.
Next, it is time to add details to your credential.
These details include all the necessary information related to the event or course that will be linked to your credential.
The details for your credentials have been successfully added.
Now is the moment to create a certificate or a badge. You have the option to select which one you would prefer to design and send during the Credential Design step. You can also choose to design and send both a certificate and a badge if you wish.
Create an email template for sending your certificate. This section provides you with the opportunity to personalize the email that will be sent to your recipients.
Lastly, you will need to add recipients. To test the delivery process, consider adding yourself as a recipient with an active email address.
You also have the option to import an Excel file containing a list of recipients to send this credential to.
Congratulations! You have completed all the necessary steps to send your credentials. If you wish to keep your credentials private from others, simply toggle the Make Private button.
You are now prepared to preview and send your certificate. Additionally, you have the option to send a test certificate to yourself or schedule your credential for a specific time directly from the preview page.

In conclusion, Sertifier stands out as an innovative and comprehensive solution for digital credentialing, transforming the traditional processes of certificate and badge issuance. With its intuitive interface and powerful features, users can seamlessly design, send, track, and store digital certificates and badges, making credential management more efficient and impactful.
Whether you are an educator, employer, or event organizer, Sertifier’s robust tools enable you to automate and streamline your credentialing tasks. From crafting visually appealing certificates to leveraging analytics for measuring engagement and marketing contributions, Sertifier equips you with the resources needed to enhance your credentialing initiatives.
By integrating features like bulk sending, customizable templates, and detailed tracking metrics, Sertifier ensures that every step of the credentialing process is covered, allowing you to focus on delivering value and recognition to your recipients. Register today and experience the ease and effectiveness of digital credentialing with Sertifier.


